Model is an important component of any MVC application , the M in MVC , which represents the data and the business rules with which our application works.The Model component represents the business entities for our application’s domain by different Model classes.
So if our application manages Employees in an organization then the Model class to represent the employees may be represented by an Employee class.Our Model classes can consist of just the properties representing the data or they can define the business rules as well.
The data which the user enters on the screen is assigned to the model properties in the controller.As this data is part of our business domain so it is important to validate it.User should be allowed to enter only the valid data.Allowing invalid data would sacrifice the integrity of our application and could make it unstable.So model validation should be a part of any MVC application.
Model validation means to validate the data our application works with.If the user enters any data incorrectly or doesn’t provides any required information then the user should be notified.
There are few different approaches by which we can perform the Model validation to verify if the data entered by the user is valid.Some of the ways we can validate the data are:-
- Explicitly validating the data in the action methods
- Using Data-annotation attributes to perform validation
- Using client side validation
- Defining custom validation attributes
Explicitly Performing validation in the action methods We can explicitly perform model validation in action methods. If any particular property is not valid as per the business rules defined for our application then we can add the error for that property to the ModelState property. Our controller inherits ModelState property from the base controller class.
We will be using the following employee class for our validation
public class Employee
{
public int EmpId { get; set; }
public string Name { get; set; }
public string Department { get; set; }
public string Address { get; set; }
public DateTime JoiningDate { get; set; }
public string Email { get; set; }
}
Though the above class defines just the properties we can also define methods for the business rules in our Model class.To perform validation we need to verify the property value. For example to make the Name property as mandatory we can add the following error message
if(string.IsNullOrEmpty(emp.Name))
 {
   ModelState.AddModelError("Name", "Please enter name");
 }
To add the error to the ModelState we use it’s AddModelError method.If there are any errors added to the ModelState then IsValid property value will be false ,which we can check to see the presence of any validation errors.
if (!ModelState.IsValid)
 return View();
      else
  return View("Completed");
If there are no validation errors then we return the “completed” view else we return the same view.
Property errors We can specify the property errors by providing a key when adding the error message to the ModelState.
ModelState.AddModelError("Name", "Please enter name");
We can display the property errors in a view by passing false value to the @Html.ValidationSummary helper method.
@Html.ValidationSummary(false)
Model errors We can specify the Model errors by leaving the key as empty when adding the error message to the ModelState.
ModelState.AddModelError("", "Model error");
We can display the Model errors in the view by passing true value to the @Html.ValidationSummary helper method.
@Html.ValidationSummary(true)
We create a strongly typed view for the Employee class and then just add the HtmlHelper method for validation as highlighted below.
@using (Html.BeginForm("Details", "Home"))
{
<table >
<tr>
<td colspan="2">@Html.ValidationSummary()</td>
<td> </td>
</tr>
<tr>
<td>@Html.LabelFor(x=>x.EmpId)</td>
<td>@Html.TextBoxFor(x=>x.EmpId) </td>
</tr>

<tr>
<td>@Html.LabelFor(x=>x.Name)</td>
<td>@Html.TextBoxFor(x=>x.Name) </td>
</tr>
<tr>
<td>@Html.LabelFor(x=>x.Department)</td>
<td> @Html.TextBoxFor(x=>x.Department)</td>
</tr>
<tr>
<td>@Html.LabelFor(x=>x.Address)</td>
<td>@Html.TextBoxFor(x=>x.Address)</td>
</tr>
<tr>
<td>@Html.LabelFor(x=>x.JoiningDate)</td>
<td>@Html.TextBoxFor(x=>x.JoiningDate)</td>
</tr>
<tr>
<td>@Html.LabelFor(x=>x.Email)</td>
<td>@Html.TextBoxFor(x=>x.Email)</td>
</tr>
<tr>
<td><input type="submit" name="submit" /></td>
</tr>
</table>
}
If we don’t enter the value in the Name field and submit the form then we get the error “Please enter name”.
Performing model validation using data annotations We can attach the metadata to the model class using the attributes in the System.ComponentModel.DataAnnotations namespace.We can apply the attributes defined in this namespace to apply the validation rules for the class properties.For example we can make a property as mandatory using the Required attribute.
The important validation attributes defined in the System.ComponentModel.DataAnnotations namespace are:-
- Required Ensures that the property value is mandatory
- StringLength Ensures that the length of property lies between minimum and maximum values
- ReqularExpression Ensures the value of a property is equal to the pattern specified by the regular expression
- Range Ensures that the value of a property lies between the specified range
- Compare Ensures value of a property is equal to the specified property value
- Url Ensures that the value of a property is a valid URL.
- Email Ensures that the value of a property is a valid email address.
In the following Employee class we have applied the Required,Range, Comapre,Url and EmailAddress attributes to the properties.
public class Employee
{
[Required]
[Range(2,4)]
public int EmpId { get; set; }
[Required]
public string Name { get; set; }
[Required]
public string Department { get; set; }
public string Address { get; set; }
public DateTime JoiningDate { get; set; }
public string Status { get; set; }
[EmailAddress]
public string Email { get; set; }
[EmailAddress]
[Compare("EmailAddress")]
public string ConfirmEmail { get; set; }
[Url]
public string Url { get; set; }
 }
We create the strongly typed view for the Employee class as below.We have added the validation HtmlHelper methods ValidationSummary() and ValidationMessageFor() for displaying the validation errors.
@using (Html.BeginForm("Details", "Home"))
{
<table >
<tr>
<td colspan="2">@Html.ValidationSummary()</td>
<td> </td>
</tr>
<tr>
<td>@Html.LabelFor(x=>x.EmpId)</td>
<td>@Html.TextBoxFor(x=>x.EmpId) @Html.ValidationMessageFor(x => x.EmpId)</td>
</tr>

<tr>
<td>@Html.LabelFor(x=>x.Name)</td>
<td>@Html.TextBoxFor(x=>x.Name) @Html.ValidationMessageFor(x => x.Name)</td>
</tr>
<tr>
<td>@Html.LabelFor(x=>x.Department)</td>
<td> @Html.TextBoxFor(x=>x.Department)</td>
</tr>
<tr>
<td>@Html.LabelFor(x=>x.Address)</td>
<td>@Html.TextBoxFor(x=>x.Address)</td>
</tr>
<tr>
<td>@Html.LabelFor(x=>x.JoiningDate)</td>
<td>@Html.TextBoxFor(x=>x.JoiningDate) @Html.ValidationMessageFor(x => x.JoiningDate)</td>
</tr>
<tr>
<td>@Html.LabelFor(x=>x.Email)</td>
<td>@Html.TextBoxFor(x=>x.Email) @Html.ValidationMessageFor(x => x.Email)</td>
</tr>
<tr>
<td>@Html.LabelFor(x=>x.ConfirmEmail)</td>
<td>@Html.TextBoxFor(x=>x.ConfirmEmail) @Html.ValidationMessageFor(x => x.ConfirmEmail)</td>
</tr>
<tr>
<td>@Html.LabelFor(x=>x.Status)</td>
<td>@Html.TextBoxFor(x=>x.Status)</td>
</tr>
<tr>
<td>@Html.LabelFor(x=>x.Url)</td>
<td>@Html.TextBoxFor(x=>x.Url) @Html.ValidationMessageFor(x => x.Url)</td>
</tr>

<tr>
<td><input type="submit" name="submit" /></td>
</tr>
</table>
}
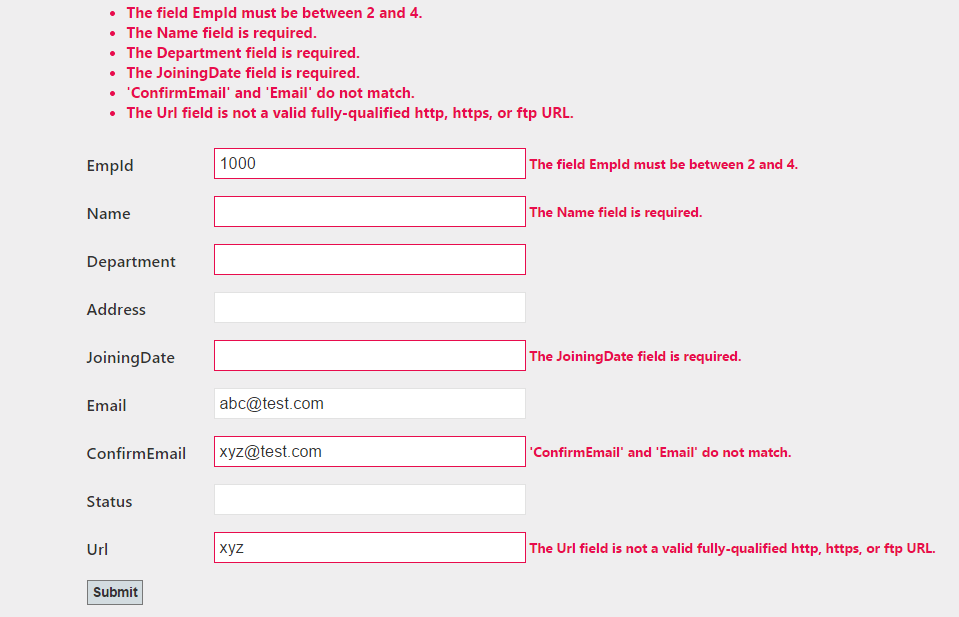
In the page rendered by the Employee view we enter the values for the EmpId and Email fields and leave the other fields blank.
If we submit the form we will get the below validation errors.Please note that we have just applied the validation attributes to the model properties and the default validation messages are provided by these attributes.We have not written any validation code.Automatic model validation is an advantage of using the data annotations to validate the model.
Client Side validation The user entered data is validated on the client instead of the server.User is informed of the validation errors immediately instead of waiting for the response from the server.
To validate the model on the client we can follow the below steps
1) Enable the ClientValidationEnabled and UnobtrusiveJavaScriptEnabled keys in the appSettings section of the web.config.
<appSettings>
<add key="webpages:Version" value="3.0.0.0" />
<add key="webpages:Enabled" value="false" />
<add key="ClientValidationEnabled" value="true" />
<add key="UnobtrusiveJavaScriptEnabled" value="true" />
</appSettings>
2) Client validation uses the jquery validation library which we need to install.We can install the required javascript nuget packages using the following commands in the package manager console
Install-Package jQuery –version 1.10.2
Install-Package jQuery.Validation –version 1.11.1
Install-Package Microsoft.jQuery.Unobtrusive.Validation –version 3.0.0
3) Once we have the required javascript libraries we need to reference the them in the views.We can reference the following libraries in the layout view so that client validation can be used in all the views.
<script src="~/Scripts/jquery-1.10.2.js"></script>
<script src="~/Scripts/jquery.validate.js"></script>
<script src="~/Scripts/jquery.validate.unobtrusive.js"></script>
4) We just need to apply the data annotation attributes to the model class and the validation will automatically happen on the client instead of the server now.
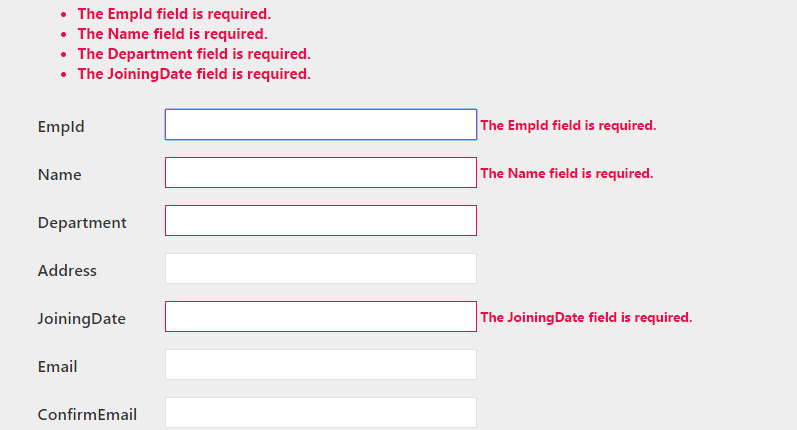
If we take the example of the employee class then once the reference to the javascript libraries is added and the form is submitted then the data is not posted back to the server ,instead user is notified of the errors immediately.The advantage of doing validation on the client is that it saves a trip to the server for performing validation.
Validation happens on the client
Defining custom validation attributes We can create custom validation attribute by deriving from the ValidationAttribute class.ValidationAttribute is an abstract class which defines IsValid method.We can define our custom validation logic by implementing the IsValid method.
We can create a custom validation attribute for the Employee class as
public class ValidateEmplooyeeAttribute : ValidationAttribute
{
 protected override ValidationResult IsValid(object value, ValidationContext validationContext)
 {
 if (value != null)
 {
    Employee employee = value as Employee;
    if (string.IsNullOrEmpty(employee.Name) && (DateTime.Compare(employee.JoiningDate, DateTime.Now)<0))
 {
   return new ValidationResult("Please Enter a valid Name.");
 }

 }
   return ValidationResult.Success;
 }
}
The above class verifies if the name is empty.If the name is empty it returns a ValidationResult object and passes the error message as a constructor parameter.
The advantage of defining a custom validation attribute is that we can implement validation functionality not provided by the built in validation attributes.
So as we have seen there are different ways we can perform Model validation in our MVC application.We can select the most appropriate approach depending on the scenario.


